![]()
Rotax thermostat, Rotax 532 thermostat, Rotax 582 thermostat, Rotax 618 thermostat installation. |
|
![]()
|

Rotax 532 and Rotax 582 liquid cooled engine thermostat installation. |
|||||
|
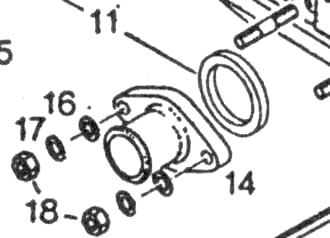
The 532 Rotax and 582 Rotax ultralight aircraft engines are liquid cooled. To help them maintain a constant temperature, and to aid in bringing them up to operating temperature, especially in winter conditions they should have a thermostat installed in them. ROTAX does NOT ship the engines out with thermostats! To install the thermostat you must first drain your coolant down to a level just below the cylinder head in an upright engine installation. In an inverted installation the system must be drained until their is no fluid in the engine. Next use a Philips screw driver and loosen the two
clamps which are used to hold the rubber intake sockets onto to the intake
manifold, you only need to loosen one clamp on each carb. Once this has been accomplished you need to remove the two nuts, lock washers and flat washers holding the top of the rotary valve tank bracket. You must also remove the two TOP 13 mm head bolts, lock washers and flat washers from the top of the intake manifold plate. Now gently pull out on the coil mounting plate until it is clear of the two top two studs. You may have to slacken off the spark plug wires to do this. Remove the water outlet socket. Behind it you will find a rubber O ring remove it. Now to install the thermostat first install the
NEW rubber O ring that comes with the
|
|||||
|
Reinstall the water outlet socket. Reinstall the coil mounting plate. Reinstall the two nuts, lock washers, and flat washers. Reinstall the two 13 mm nuts with their flat washers and lock washers. Torque the 10 mm bolts to 98 inch lbs. Torque the 13 mm head bolts to 155 inch lbs. This torque IS NOT what is recommended in your manual! BUT if you torque to 195 inch lbs. you will likely strip the threads in the casing! The casing has only a few threads in it, if you strip them it is a very expensive job to have them repaired! Fill your system up with fluid, with the thermostat installed fluid has to come in from the lower water outlet, it may take a couple of minutes depending on the installation to get up into the engine. Remember use distilled water or corrosion will start inside your engine! |
|||||
|
|||||
| Have high speed internet & Real Player installed? Subscribers to the Ultralight Flyer web video magazine have access to Rotax Engine Rebuilding videos right on the web. | |||||
|
1 2 3 4 5 6 7 8 9 10 11 12 13 14 15 16 Index for this section. |
|||||
|
|
|||||
| Ultralight Aircraft News Web Magazine .-.-.-. . No part of this publication may be copied or distributed, transmitted, transcribed, stored in a retrieval system, or translated into any human or computer language, in any form or by any means, electronic, mechanical, manual, or otherwise, without written permission . By copying or paraphrasing the intellectual property on this site, you're automatically signing a binding contract and agreeing to be billed $10,000 payable immediately. Copyright Ultralight News - Ultralight Flyer. |
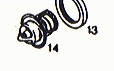 thermostat, ONTO the thermostat. The
thermostat fits into the MIDDLE of the O ring. That is there is a slit in
the middle of the NEW "O" ring place
the thermostat into it. Once the O ring has been installed onto the
thermostat, place the thermostat with the "POINT" of the
thermostat facing out, the "FLAT" side facing in and the two
holes in the outside ring of the thermostat facing UP toward the sky!
thermostat, ONTO the thermostat. The
thermostat fits into the MIDDLE of the O ring. That is there is a slit in
the middle of the NEW "O" ring place
the thermostat into it. Once the O ring has been installed onto the
thermostat, place the thermostat with the "POINT" of the
thermostat facing out, the "FLAT" side facing in and the two
holes in the outside ring of the thermostat facing UP toward the sky!